Friday, July 20, 2012
A long overdue bid to Betty goodbye...
So last year when I got promoted and had to move from Holland, we were faced with the tough decision on what to do with Betty. We just didn't have the room. I ended up selling her to a guy in Indy (ironic as that was where we were headed) and traded her to him for the pinnacle of redneck midwestern trade - guns. Ultimately I took it on the chin with the sale, but I had no choice. Betty will go down as one of the longest and funnest projects I've worked on, but also the biggest failure in terms of return on investment and completion. I did learn a ton working on her, but it was to no avail. That ends with a sad..... : (

Tuesday, November 30, 2010
Betty....meet Clyde.
Betty lost her bones. Clyde lost his body. Together...they made a car...after a little hacking. Right now, the body is getting lined up right, the radiator location mocked up...along with that toothy front bumper we love. After everything is mocked up, the body will be lifted up, the frame sprayed in Eastwood rust encapsulator, and everything bolted up. The motor is going to be left stock for now, aside from an Offenhauser intake and Holly carb I picked up.

The frame of Clyde has a 121.5 wheelbase. The wheelbase of Betty is 121. Many told me the frame from the Rivi's is "so good" that it basically just "bolts up" to the body. That is complete bullshit. They are close...but the rear frame rails on the original 50 frame sit much higher to accommodate the higher-sitting trunk in the 50, as opposed to the 15-body bag size trunk in the 75' Rivi. Easiest method was to hack the rear legs of the frame off, and build our own to match the trunk. The transmission crossmember was also sectioned on the left side, and a piece of tubing welded in to accommodate a dual exhaust pipe on that side, so both pipes will hang the same and not drag.

Here is the completed rear section.

In the front, a new radiator channel has to be made, as the stock radiator is a tall copper unit that is completely different than the Rivi radiator. Plus the copper one is probably over in china by now courtesy of Padnos recycling...getting made either into wire, or some cheap windchime trinket.

Ohh...just a teaser on how she's gonna look soon. I'm getting stoked! She still needs a ton of work, but we're moving faster than ever before. I plan on getting over to Petey's tomorrow to do some motor work. Stay tuned...we're rolling again!
Betty's got wings....

So here we are...over 2 years after starting on Betty and I was beginning to get tired of the old gal sitting in the garage. My Jeepster project was finished and sold (traded) for a boat and 2 Fieros..one of which I ultimately sold for guns and cash (how cool is that? Selling a car for guns!) and the other I scrapped. I spent the rest of the summer fixing up the boat I traded for and then got started re-building the motor on "Red," the 1955 Jeep CJ5 I picked up. I had to do something with Betty.
I put her back on ebay in June and had a guy who locked. On the way from southern Illinois to pick her majesty up, the buyer and his buddy, both armed with trucks and trailers, headed strait into a nasty storm, into a swerving semi, into a ditch, and into not coming and picking up Betty. Call it fate. The bitch was ours for the long haul.
While out doing sales calls one day in October I stumbled upon Petey's Pit Stop in Grandville. Mike Leland, the owner is an old hot-rod guy who would rather be welding rust and torching gas tanks than changing pads on Volvos, so he seemed legit. I had to unload Betty for awhile...you know...send her to band camp. Petey's had a lift...which would save me the painstaking bitch of trying to line Betty up in the driveway with a forklift holding the body up. I'd let Peteys do the work getting the body mounted on Clyde...and Mike was happy to oblige. So we set off in two trips...one to get Betty over to Petey's.....two...to get Clyde, which Jim was VERY, VERY happy to get Clyde the f*ck out of his yard!

Arrival at Petey's!!

Mike and I scope over the dream....he was ready to start hacking!

Shameless plug for Petey's!
Thursday, February 11, 2010
'ol Betty: The gal we love to hate, and hate to love
Ok, it's been a long while since we've updated this, or frankly, done anything to Betty. It's been since before Winter. I wish Spring would sprung already. This Winter has been long, and it seems to be never-ending. For the past several months Tim has been busy working on "Captain Aardvark" AKA "Harold" (1968 Jeepster Commando) in the cold, cold garage while Betty looks on. Tim flip-flops back and forth whether or not he'll get Betty done... secretly I think he really wants to finish her himself. What a proud accomplishment that would be, especially when you look at how far we (well, he) has come with the 'ol gal. I guess we'll see this Spring (if it ever gets here...)
I can't believe this whole thing started at the end of 2007. It really doesn't seem like it's been that long. I can't believe how many times we've wanted to throw in the towel and give up. But one look at Betty's...face? and we're back at wanting to fix her up ourselves. We can't give up now... can we? -SH
I can't believe this whole thing started at the end of 2007. It really doesn't seem like it's been that long. I can't believe how many times we've wanted to throw in the towel and give up. But one look at Betty's...face? and we're back at wanting to fix her up ourselves. We can't give up now... can we? -SH
Saturday, August 22, 2009
The carnage of Clyde....

Well, poor Clyde sacrificed his life today. Armed with a sawzall, a circular saw with a cut-off wheel attached, and a grinder, Clyde began the process of giving up his frame for Betty. Inside the depths of Clyde's interior we managed to find a Hardee's coupon for a Turkey sandwich that expired in 1984, and a receipt to a drug store from 1975, probably when ole' Clyde had just rolled off the lot. We let Jim's kids prove the urban legend that just a gentle toss of a piece of spark plug porcelain will shatter a window, and Dawn, Jim's wife, enjoyed throwing a brick through the front windshield several times. She enjoyed it. What's seen here is two days worth of work, but by next time we should have the car ready for the 50' body to plop down on top.

Wednesday, August 5, 2009
Duh-na,na,naaa....I'm working again!
You know, I've been over this whole keep the car - sell the car thing about 40,000 times over the last year, and I think I've finally decided that I need to just roll my sleeves up and get this damn thing done. Today I ventured out and decided I needed to get the car's front fenders off so that the body can be ready to lift off. I've decided to hold off on finishing the body work on the front half of the car until the body is sitting on the 75' Riviera chassis. If I can get that far, the rest is all downhill. -TH

So today I ripped the fenders off. It went surprisingly easily. Bolts that were rusted in place simply broke off with a good tug. I did break 3 bolts off where the fender mounts up to the rocker panel, and those will need to be drilled out and re-tapped later. Not a huge deal. After removing the fenders I had a heaping pile of sandblaster sand and crap. I even found an old Snap-on wrench inside the fender! I'll have to use that somewhere on the car! -TH


So today I ripped the fenders off. It went surprisingly easily. Bolts that were rusted in place simply broke off with a good tug. I did break 3 bolts off where the fender mounts up to the rocker panel, and those will need to be drilled out and re-tapped later. Not a huge deal. After removing the fenders I had a heaping pile of sandblaster sand and crap. I even found an old Snap-on wrench inside the fender! I'll have to use that somewhere on the car! -TH

Thursday, July 16, 2009
Every year is getting shorter, never seem to find the time.

Pinky-swearing we do! Our wedding - June 6, 2009 Shiojiri Garden, Mishawaka IN
Tim and I finally said our "I Do's" On June 6, 2009. The day went off without a hitch, and we happily boarded our flight to Italy 2 days later. We spend a wonderful 2 weeks in Italy surrounded by family and very (very!) good food and wine. Now, its back to the daily grind of work, work, work... and more work.
As you can imagine, we haven't even touched the car. What was her name again? Oh, right.. Betty. Poor gal. Lots of things have gotten in the way.. home-ownership, for one. Pure laziness for another... and a slight lack of motivation.
Tim is looking at a few options of what we'll actually do with Betty in the future. Maybe hiring someone to "marry" Betty and Clyde together to create a frankenmonster car & finishing the rest of the details himself.. or maybe we'll sell them both. Or maybe we'll sit on them for another 6 months trying to figure out what we really want to do. Who knows, at this point. Not me.
The idea of finishing Betty is so awesome. The practicality of it.. is daunting, to say the least. In all honesty, I have no idea what will happen with her. Stay tuned... -SH
Tuesday, May 12, 2009
Wow. Long time, no... well... anything, really.
So, it's now May and the last update was in... February? Jeez-ow.
I can't say we've done much of anything with Betty, besides getting her a new friend (whom we affectionately call Clyde) and primer her "rear end." I think at some point Tim cleaned up around Betty's 'area' - took down the makeshift work-booth he had, swept under her belly, etc. It was more of a Spring Clean for the garage, and she just happened to get in on a little of that action.
Every couple of weeks or so Tim says to me "I really need to get workin' on Betty and get her finished." Maybe some day we'll start working on her again. But you know how it goes with excuses. First, it was "too cold" to work on her in the garage. Then, Spring came and it's always "too nice" of a day to do anything but yard work. And of course, we've got our wedding in just 25 short days, and a 2-week honeymoon in Italy that will, of course, get in the way.
So, I wouldn't hold your breath, but you can still hope for the best. She'll get done. I just don't know when. -SB
Sunday, February 8, 2009
PRIMER!
Well, I am officially 5 months behind schedule on when I said I'd actually have primer on the car. Luckily, the weekend I planned for primer (Feb 7th) the temperature shot up from 5 degrees outside to 55, so heating the garage would be easy! I planned to prime the whole back half of the car, all the way up to the doors, minus the roof. There were a few very very small spots that needed spot putty and a little finesse, but for the most part, the rear was 98% done.

I opted to go with a Urethane based, high build primer from Paintforcars.com. They sell quite heavily on ebay and the price was good. I consulted with Finishmasters in Grand Rapids on what primer to use, as I was initially going to use an acid etch first, then go with a build. When I told the guys I really wasn't looking for a concours paint job and the end result was going to be a flat finish anyway, they said that a Urethane high build would work fine over metal. The primer from paintforcars was 88.00, plus a quart of reducer took me to around 100.00.

The first batch I mixed up a little too thick and it shot on like undercoating. Luckily it laid down a bit, so no biggie. Overall, a very easy primer to use, and built-up very nice. Finally, the rear doesn't look like a hodge-podge of multi-colored primer and metal! From here I'll start working on the front of the car (which will be much easier and less time), prime that, block the whole car, and be moving on to paint. I will need to remove the front fenders at some point, as when we do the body swap, they'll need to be off.

Here's the finished result after two coats.

Saturday, January 10, 2009
Cost update!
I figured I'd ponder for a minute on the cost factor so far in Betty.
When we last left you, the car, cost of the Ohio body panels, body filler, sheet metals, and basic shop supplies was at about 3,600.00.
Purchasing the 1975 Riviera was 1500.00. I look to recoup some of that cost, as I'll sell anything off of the body of the car (doors, front fenders, hood, rear quarters, glass) that I can, and scrap the rest of the body. I would think I could recoup at a minimum 400.00 from this, maybe more. At any rate, that puts the total project at 4,900.00.
I don't see any major costs coming up until the 455 motor gets worked over. Well, let's hope!
Gimme Shelter!
So after a few days of filling and sanding in the garage, I realized that I was getting a lot done. The backside of the car was sanded smooth with 220 and ready for primer. The drivers side rear fender was getting close...awful close. I tried not to get that "screw it, it'll do" attitude, so I kept going over and over, looking and feeling for any discrepancies, spraying a thin guide-coat of dark grey primer and checking. So far, so good. Then, I realized after just 2 days that I was making a complete dusty mess in the garage.
Now, I'm not like some crazy garage clean freak, but when my tools, shelves, quads, and camping gear get covered with a layer of filler dust in 2 days, I knew I had to do something to contain most of the dust. Enter....the shelter.
I decided to take a regular camping shelter, 4 rolls of 2mm plastic drop cloths (it's about the thickness of Visqueen...maybe a little thinner) and ran the plastic all the way around the shelter. In the front, I draped the plastic around the hood, and for the most part, the entire area was sealed up, other than the underside of the car. With the torpedo heater right inside the shelter, the area (and the car) heats up in a serious hurry, and stays warm. It also helped contain the dust.

For the most part, I've spent the last few days (about 4 hours) finishing up the driver's side rear fender. It's just about done. Today I worked my way over to the passenger side, which is going much quicker and easier than the driver's side. The passenger side welds and metal were much easier, and I had got the hang of welding the channel much better on that side. My guess is that I'll probably be done with the back of the car soon, and be able to get some primer on it. I've made more progress on the car in the last week than I made in 4 months. This is good. The front half of the car has probably 1/4 of the body work needing to be done, so things are moving along well. I've sourced out some primer, and decided to go with a urethane multi-use primer that can be put over bare metal, rather than doing the etch, then a build primer. Once again, it's not going to be a concours car. I think I've opted to go with a basecoat / clear, and use flattening agent in the clear to get that suede look I'm after. I've heard too many horror stories about using Hot Rod Flatz metallic paints and trying to get them to lay right. So...that's up in the future, until now, I'll be chilling in the shelter, which is more like a suana when that heater runs for awhile!
Oh, and the Riviera sellers called back - the new motor and tranny are in, and the car is supposedly going to be delievered tomorrow. Gulp.


Here, the driver's channel is on it's last little spot coats...
Sunday, January 4, 2009
Sanding is a 7-letter word.
Yep...I'm back on the body work again after a long long time delay. In fact, I don't think I've even laid a piece of sandpaper on this car since August.
I got back on sanding the drivers rear fender and worked over to the passenger side, while putting the final touches on the rear. I also needed to take my abrasive sponge wheel and take off all the surface rust that had formed on the backside of the car. This had happened from when the garage door was open and it was snowing. Just a little dusting of snow on the bare metal and surface rust had started. I now have a cover for the car.
Here's the drivers side...getting closer to being done.

I'm hoping to have primer on at least the back half of the car by February (I've heard that before).

Saturday, January 3, 2009
At it again update....
So the sellers of the big green Riviera called me (see, Ooops, we're at it again to find out why the hell we bought a 1975 Riviera) to tell me more bad news. One, the tranny was definately bad, but what's worse, there was coolant in the antifreeze, which indicated either a cracked block or head, or in a very rare case, a headgasket leaking coolant into the oil. I had sensed that something was up when I noticed a new radiator, water pump, and thermostat, all changed by the sellers within a few weeks. It seemed to me like they were chasing a problem - that problem more than likely was a cracked block or head, and coolant getting lost in the oil. What's worse, is this explains the oil light coming on while I was driving home. The coolant was slowly galling the bearings until there was no oil pressure left. They simply hadn't driven it far enough, and at the massive-transmission-slipping RPM's that I had on the way home, it sealed the deal. I was blowing up the motor and didn't even know it. Fun.
So the sellers were at a complete loss on what to do. Honestly, I consider myself very lucky. I could have had some sellers that just told me to get screwed, and then I was stuck with a car frame missing the two most important parts of the swap - the motor and tranny. What's even odder is that they told me they were going to try to find a motor and tranny for the car, and put it in... I told them I didn't see how this was possible as the cost involved in this would probably be over what the vehicle was worth. I felt really bad for these people. They had the worst string of luck and felt obligated to do something about it. At this point they were stuck fixing a car that utimately would cost them more money to sell than it was worth. We agreed for them to return my money to me and I would call this a dead issue - a major bullet dodged for me.
But then...they called me back on Friday to tell me they had just got back from Iowa, where they found another 455/400 from a 1976 Electra, and were in the process of having a garage install the motor and tranny! They even pulled the trans apart to change the front pump seal and the rear main seal of the motor. They told me they wanted everything perfect. I asked for picture documentation of what they were doing and they agreed to take as many as they could.
You can't buy this kind of dedication for 1,500.00.
Stay tuned.
Saturday, December 27, 2008
Oops...we're at it again.
We came very close to selling Betty. I put her on ebay, got some lookers and then after the auction ended under reserve, I decided to throw a cover over her, let some time go by, and decide whether I wanted to tackle this project after all.
My main dilemma was still the old, outdated drivetrain and suspension. My dream scenario would be to have a Nailhead / manual combo, but I knew that having this anyways was going to involve first, finding one, and second, some major fabrication on the existing frame....and even then, I'm still stuck with updating the suspension and brakes, all of which were seriously tired. I was going over and over these things again and realizing how much work I was getting into. On top of all this, the straight 8 engine was cool, but took a lot, and I mean a lot, to get a decent amount of power....coupled with the fact that the dynaflow trans is about the most pathetic example of an automatic transmission out there.
I had steadily been returning to Dan Speakin's cardomain page (see HERE) where Dan took a mid-70's Cadillac Deville chassis, cut the body off, leaving the floors and firewall, shortened the frame 6 inches to match wheelbase, and welded the Buick body on the Caddy floors and chassis. This way, you get the updated suspension and in this case, huge ass 472 engine, and everything is done for you. Dan also channeled the body a bit to drop the body down more on the frame, eliminating any need to lower the suspension.
Many on the Buick boards had talked about using a 71-73 Riviera. The wheelbase is exactly the same (well, off by 1/2 inch) as the Special, at 121.5". Come to find out, the 74 and 75 Rivi's also use the same wheelbase. This way, you get the 455 engine, 400 tranny, and 12 bolt rear end to boot. Power brakes, front disc, power steering, and even A/C make a whole lot of options I couldn't dream about doing on Betty. Only trouble would be finding a good 71-75 Riviera that's not too far away, and actually has good floors in it to swap over. Well, I let a 73 get through my hands for 400.00, but it was in New Jersey, and it was trashed, rotted floors, and a possum living under the hood. Probably better that I let that one go.
So I waited and waited, kinda giving up on the idea. I'd see the occasional one pass, but 71-73's are usually always going for between 3-5K, even in bad shape. 74's and 75's are so rare, that you never see them. Then, 2 days ago, I found one for 1,600.00 on ebay.
It was a 1975, 60K original miles and nearly everything original on the car. I almost hated to hack the thing up it seemed to be in such good shape - but then again, I don't see a long line of people waiting for one. What's better, is that they lived just a few hours away on the other side of Michigan. I managed to get ahold of the people and snagged the car for 1,500.00.
Once we got on the road, all the fun began....

The 2 feet of snow we had got in the last 2 weeks suddenly melted the day we left, when temperatures shot up to 55 degrees in about 12 hours, coupled with rain. The result was a super thick fog that literally made for less than 40 yards visibility all the way there. Fun.

Here she is in all her glory. Notice the thick Steven King horror story fog in the background. The car was really in miraculous shape. Outside of one busted front turn signal lens and a plastic piece on the corner of the trunk, the car didn't look too bad. No rust anywhere, solid floors, motor sounded pretty fair...just sounded old - even with 60K miles! Even if I ended up giving up on the Betty project, this car could fetch some money if re-worked correctly. Then I got the bad news - apparently the tranny started slipping on the way to the meeting point. According to the sellers, the car had never done this before, and they had just had the transmission serviced a few weeks prior. I opted to take the car anyways, as the sellers reassured me that if anything went wrong on the way home, they would take care of it. Unfortunately, things went way, way wrong.
The car took about 5 miles to get up to 55MPH. 1st and 2nd gear slipped so bad I'm surprised they even moved the car. The transmission chattered and banged like hell until it finally dropped into 3rd gear. I managed to get it up to 60MPH for a brief 50 miles until the oil pressure light came on and the car started making some funny noises under my feet. Rather than risk anything, I made a bee-line for the nearest exit. The car died at the stop sign at the end of the ramp. I got out to find antifreeze pouring out from underhood. She had overheated badly and I didn't even know! Nice to know the idiots at GM decided a coolant temp gauge wasn't important in those days.

Luckily, I had left a towstrap in the Ridgeline and we used it to tow the Rivi-beast into the gas station nearby. The Ridgeline happens to be the best damn truck in the world and should you come across one, you should buy it. (Shameless Honda Ridgeline plug). Upon inspection, the car did have a new radiator and water pump, as the sellers indicated. I noticed, though, that the fan clutch was just free-spinning, and that was bad news. My guess is that the high revs of the tranny slipping, coupled with the fan clutch, over-heated the motor. Here I am calling the sellers. I hate to be a pain in the ass buyer, but unfortunately, this one was a deal breaker. The over-heating part didn't bother me that much - that's easy to fix, not to mention, the motor was going to be ripped apart anyways...but I didn't expect to do a tranny rebuild. The sellers were pretty rattled by the fact the car did this. We agreed to two choices. One, I could buy the car for $1,000.00 and figure out how the hell to get it across the state and home, with them washing their hands clean of it...or two, they come get the car, rebuild the tranny with documentation proving so, and deliver it to me. I really thought they'd opt for #1, but apparently this guys' mechanic rebuilds transmissions and does a lot of them, and offered to do it for them for a cheap price. I left the car and got a call later that night that they had picked it up, and were going to deliver it to me in a few days. Score! Now I get a rebuilt tranny out of the deal.
Now my plans are to pull the 455, drop in some higher compression pistons (try to get it up from the enemic 8.2:1 the smog motors became) and get it up to 9.5 to 10:1, a new cam, manifold, and some headers. That should be all I need to move Betty with some conviction.
But for now, I wait for the car, and it's back to body work on Betty. I need to get the body work done first, then we'll work on removing both bodies and doing the swap. The Riviera will stay parked until I get the body done, and should something happen, I can always sell the car off. I just couldn't pass up a deal like this. Stay tuned, the fire is alive again! -TH
Monday, October 20, 2008
The latest, not the greatest.
Wow. Its been a while. A long while. Unfortunately, life got in the way of reBuilding Betty. Planning and paying for an upcoming summer wedding, plus a honeymoon in Italy and buying a house all seem to have taken center stage over the car. So she sat for some time in Jim's barn, keeping him company and taking up space. We decided Jim had enough time with Betty to himself, so once we got all moved in the new house, we brought Betty home with us.
I know we said we'd keep her. And we want to... we would both love to see this project to the end, and to be able to hot rod around town in a car we both helped reBuild. When I look back I see how very far we have come... and when I look forward I see how very far we have yet to go. Maybe if we had more room, or more time, or more money, or less to do.. we wouldn't feel so hopeless. But for now, she's on the auction block. Sad as it may be. Maybe there is someone out there looking for a project 1950 Buick Eight. Maybe she'll sell. Maybe she won't. Maybe we'll sit on her for another year, and then take up the challenge again. Who know what the future holds. -SB
I know we said we'd keep her. And we want to... we would both love to see this project to the end, and to be able to hot rod around town in a car we both helped reBuild. When I look back I see how very far we have come... and when I look forward I see how very far we have yet to go. Maybe if we had more room, or more time, or more money, or less to do.. we wouldn't feel so hopeless. But for now, she's on the auction block. Sad as it may be. Maybe there is someone out there looking for a project 1950 Buick Eight. Maybe she'll sell. Maybe she won't. Maybe we'll sit on her for another year, and then take up the challenge again. Who know what the future holds. -SB
Tuesday, August 12, 2008
I'm still sanding, yeah, yeah, yeah...
Almost half way through August already! We've sorta been "slackers" lately, or at least it seems that way. With the car housed in Jim's garage, its been a little more difficult to get in a good days work when all we seem to be doing is sanding a bit, slathering on a bit more body filler (oh, who's kidding.. bondo..) and leaving so it can dry. We tried not to get too ahead of ourselves and instead focus on just one area at a time (i.e. the rear end) but this makes for very slow progress. So, instead of hogging Jim's garage any longer we've decided to bring Betty home for a while so we can maybe get this sanding business over with a bit faster. Honestly, we went back and forth whether to keep Betty or sell her, and it was decided after much, much deliberation to keep her. So in between house hunting, wedding planning, and work we will (once again) borrow Jim's dads car hauler, and haul Betty over here to our tiny garage. At least if she sits here for a week without being touched we won't feel guilty about it. Maybe a little, but not much. -SB
Friday, August 1, 2008
How much I hate sanding.
See this image below? This is going to be me for the next 10 years. I hate sanding body filler. Hate it. Loathe it. Despise it. I have no patience for it. But... I try. Here I am trying to smooth out the massive discrepancies in the channel between the rear fender and body. Keep in mind, this area has been welded, ground down, filled with aluminum epoxy filler, then coated in body filler. It's a long process. It's tough to get anything in this area to sand the transition from the high fender, sloping down into the body. A short block with 36 grit is about the best you can do for now. Later, I'll smooth it out with the DA as good as I can, but currently, the last skim coat has been put on - I'll shoot it with a guide coat and see how we come out. -TH

The back in this pic has been skim coated for the last time. I'll long block this out and we should be ready for some finer grit on the DA...then on to primer. This was a long, long process getting the rear looking good. -TH


I'm sure I'll be sanding this thing for an eternity. I hoped to have primer on the whole car by August. Yeah right. Until next time...I'll be sanding, sanding, sanding, sanding...oh, and sanding. -TH
Thursday, July 24, 2008
Some of the last welds....for now...
So with the last day of my vacation, I spent the mid-morning finishing up the back end, and grinding everything down. I needed to do alot of hammering and shaping with a dolly to bring the right curvature and such in with these back pieces. They were tough. I got them good enough though that a good skin-coat of filler should smooth everything out. Should. I'm not a good body person. I have no patience. Let's hope. -TH

This little corner was rotted, so I chopped it out and fabbed in a quick piece. This'll be the last piece I weld until I do the rear floorboards later on. -TH

Here's the back with the first coat of filler on it. I've grated it down a bit, and will finish with the air file and add another coat. -TH


This little corner was rotted, so I chopped it out and fabbed in a quick piece. This'll be the last piece I weld until I do the rear floorboards later on. -TH

Here's the back with the first coat of filler on it. I've grated it down a bit, and will finish with the air file and add another coat. -TH

Wednesday, July 23, 2008
Gettin' out junk in tha trunk.
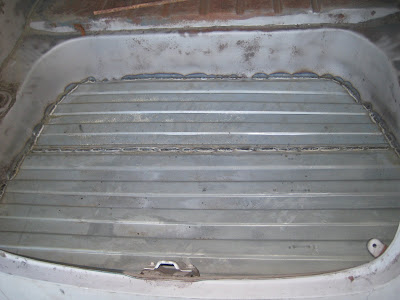
So this was the final welding frontier. The trunk. Or...what's left of it. When we finally pulled the dozens of old car parts out of the trunk, this is what was left - a nasty, rotted out trunk, with a big piece of flatstock sheet metal over the gaping hole. Luckily, the cross braces that go underneith the trunk were still in tact, so at the sandblaster, we simply blasted around the area that was going to be cut out. I chopped out the nasty cancer, and proceded to weld in the pickup truck bed replacement panels I picked up. The nasty, nasty spot was the back edge of the trunk. This spot was rotted all the way through to the back metal near the bumper. The whole thing needed to be cut out, and re-done. Luckily, I was on vacation this week, so this post covers two days of hacking, welding, measuring, cutting, and re-welding. My back still hurts from bending over into the trunk. -TH
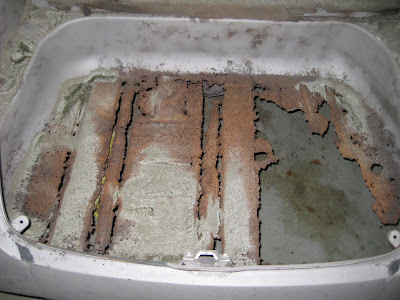
Ahhh. Much better. Looks like a new trunk! I used a large piece of cardboard as a template to cut the metal to a perfect size to fit around the edge I cut out. Worked perfectly. Once the whole thing is done, I'll cover the weld in seam-sealer, and use pickup truck bedliner on the whole thing. Now...for the back ugly stuff... -TH
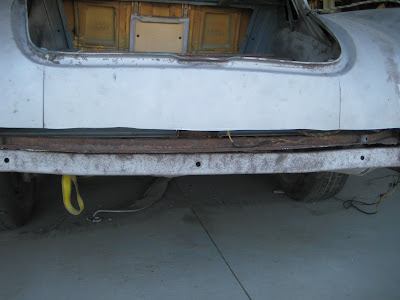
Here, you're looking at the back latching mechanism for the trunk, and the metal area around it. The metal has already been cut out from the rear of the car, and the piece that overlapped the rusty metal you see here, and went into the trunk. There's actually 3 pieces of metal that come together right at the rear of the car, and are spot-welded at the factory. The rusty piece you see here, the back of the car, which makes a 90 degree bend under the car, and the trunk floor, which sits on top. I cut away the cancer, and then split the spot welds with an air chisel. (Thank you air chisel, you always make life so much easier). -TH

Here's the back half of the car, you can see the rear cut away. Thin panels will need to be stiched in here, and have a 90 degree bend on them at the bottom, where they can be tacked to the underside. -TH
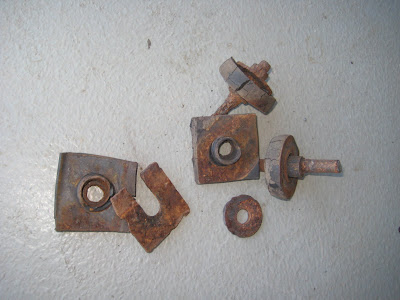
In the back, I had to remove the 60 year old rubber bushings that insulated the trunk floor to the rear of the frame. I'm not sure what I'll replace these with, but I'm sure I can fab something up easily from new parts. These had to be removed to put the new metal in. They, of course, had to be cut off. I didn't even attempt to turn them with a wrench. -TH
The rear and rear edges is where things had to get creative. The sloping side of the trunk here was all rotted out, as was the rear section where the corrugated new metal ends. The whole thing needed to be fabbed up, and stiched together. -TH


Ahhh. Much better. Looks like a new trunk! I used a large piece of cardboard as a template to cut the metal to a perfect size to fit around the edge I cut out. Worked perfectly. Once the whole thing is done, I'll cover the weld in seam-sealer, and use pickup truck bedliner on the whole thing. Now...for the back ugly stuff... -TH

Here, you're looking at the back latching mechanism for the trunk, and the metal area around it. The metal has already been cut out from the rear of the car, and the piece that overlapped the rusty metal you see here, and went into the trunk. There's actually 3 pieces of metal that come together right at the rear of the car, and are spot-welded at the factory. The rusty piece you see here, the back of the car, which makes a 90 degree bend under the car, and the trunk floor, which sits on top. I cut away the cancer, and then split the spot welds with an air chisel. (Thank you air chisel, you always make life so much easier). -TH

Here's the back half of the car, you can see the rear cut away. Thin panels will need to be stiched in here, and have a 90 degree bend on them at the bottom, where they can be tacked to the underside. -TH

In the back, I had to remove the 60 year old rubber bushings that insulated the trunk floor to the rear of the frame. I'm not sure what I'll replace these with, but I'm sure I can fab something up easily from new parts. These had to be removed to put the new metal in. They, of course, had to be cut off. I didn't even attempt to turn them with a wrench. -TH

The rear and rear edges is where things had to get creative. The sloping side of the trunk here was all rotted out, as was the rear section where the corrugated new metal ends. The whole thing needed to be fabbed up, and stiched together. -TH

Here's the rear of the car, in progress. This is a tough piece as the back of the car has a slight roundness to it. This so far has been alot of tacking, hammering into shape, and tacking again. Suprisingly, it's coming together good. The back seams that run vertically from the trunk down on both sides will be welded shut and smoothed down (the one on the left is already welded). -TH

Here is the underside of the rear pieces. You can see the 90 degree bend, and stiched to the underside. Luckily, we sandblasted alot of the scale off this area, otherwise it wouldn't have welded at all. -TH

Thursday, July 17, 2008
Rockin it....part II
Well, before I started on the rocker panel on this side, I needed to tackle that filler-infested rear part of the rear fender. Here, the patch panel is stiched in. I had to set the welder really really really cool because there was spots all over in the left side that just burned right through, even with just a quick 2-3 second spot-weld. This panel was really pretty easy to fabricate, it's just a square piece of metal that's rounded down. -TH

Here's the finished product, after the welds are ground down. Hard to believe its the same panel. There's still a small piece at the end of the fender lip (at the bottom) that still needs to be cut back. -TH

Yeah...so here's the rocker from the passenger side. Not as bad as the drivers, but nasty enough to house an ancient civilization of mice at one time. Yum. There was actually bare, clean metal on the inside of this rocker that didn't have a speck of rust on it. Crazy. -TH

I figured I'd just cut to the chase on this one...you've seen the other side. Here this rocker is, done. Notice, once again, all the holes down the door to pull out the metal at one time. -TH

Subscribe to:
Posts (Atom)