Sunday, June 29, 2008
Why in the hell are we in Ohio?
Junior, the steward of Surplus Supply Co. turned out to be one cool cat.
http://www.surplussupplyco.com/
So....I came to the realization that if there were any sort of replacement panels out there for Betty, I needed to get my hands on them just to save me some time in fabricating. I was hoping to score some direct replacement rocker panels, or even similiar-to direct replacement rocker panels. Hell, in 1950, how many differences could there be between the cars, especially rockers?
So I scoured the interwebs and found Surplus Supply Company. Their website showed lots of stuff for 40's-50's Ford and Chevy, so I figured I just might score a few Buick parts, or even find some Ford or Chevy stuff that would...or could...be fabricated a hell of a lot easier than flat sheet metal.
I noticed they were located in Akron, OH, which was only about 5-6 hours from Holland. It just so happens Sara's brother lives another 2 hours from Akron, in Athens, OH...so a weekend trip seemed like a pretty good deal. This way, I had the ability to look at any panels and decide whether or not they'd work for the Buick. That way, I'd also save face on the dreadful shipping. -TH
At first I was a little worried about the guys here...but turns out they were super cool. To say the place is a pile full of new and NOS parts is an extreme understatement. If you look closely in the top picture, that huge man-sized stack of what appears to be near-flat strips of metal are all new-old-stock rocker panels! They dug and dug to find the two panels for the Buick. Turns out, the company, Schofield, went out of business in the 1960's! -TH
Here I am, checking out a 1970's Chevy Blazer quarter panel patch piece, deciding whether it would work for the Buick rear fender. I opted not to buy it and decided to fabricate up my own panel out of some other goodies I bought. -TH
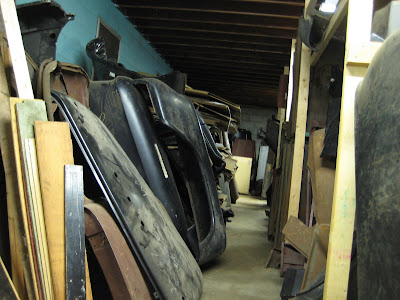
Yeah, tons and tons of parts. Everywhere. I have no idea how they find anything. -TH
And this was just the beginning! There were rooms and shelves all over this warehouse-of-sorts with piles and piles of metal. And these two guys knew right where to look for anything Tim asked about. It was quite surreal, watching them pull piece after piece down just to get the one thing they were looking for. It was set up totally old-school in the sense that there was no real "system" to all of the madness, just the car makes and years labeled in permanent marker with arrows pointing all over the place. Each piece had a part number on it, and quite honestly, I think those two guys are the only two people in the world that know what each number means. -SB
In total, we scored some pretty good stuff. I was hoping that the pre-formed Ford trunk floor they sold could be used in the Buick, but it was too small. And the Nova and a Chevelle trunk floors, while feasable, were just too expensive. I opted for 3 pieces of truck bed repair panel that I can form into the desired piece to go in the trunk. JC Whitney had it for the same price, plus the shipping though. The rockers are Schofield NOS rockers. The two floor pans are for the rear of the floor, which was patched very poorly. They're from a 50 Chevy, but should work fine. I was about ready to leave when I asked him if he had any scrap or flatstock, and he showed me a Chevelle rear quarter panel that was damaged, and cut in half...PERFECT! Just the amount of material I needed to finish up fabricating the outside of the trunk, and the fender edges - plus I have nice, long pieces now to use, which was going to cost bigtime if I went and bought flatstock. (Underneith that long panel are 2 other pieces) Everything ran me $300.00 which brings our total so far to about $500.00 (minus the initial cost of the car).
Considering that there are NO vendors, or places that make any panels for these Buicks, I think I did pretty good. Looking through the old, dilapidated Schofield catalog, the only panel even available in 1965 for the car was the rockers. While they make (or made) tons of parts for 51-59 Buicks, the 50 is in a league of its own, with nothing available. O well...we got what we needed and headed on to Athens for the weekend. -TH
What was cool was the Schofield company address didn't even have a Zip code then! Talk about old! Plus, the little Schofield dude (adequately named "Sco-Joe") looks Jazzy and right out of a Jetsons episode! -TH
Saturday, June 21, 2008
Bending Metal
Early on this day I got the rest of the lower rocker and wheel housing fabbed and welded in, and then I turned to the front of the rear fender. There are no available patch panels that I've found anywhere, so we had to fab up our own panel to use. Trouble is, the 90 degree edge of the panel is semi-circular, and transitions outward, away from the car, forming a lip, before bending into the 90 degrees. Oh, and it curves downward, under the body, similiar to what a rear quarter panel on any truck looks like....sort of. After cutting the panel, we used a piece of metal rod that was the correct diameter to make the bend, heated and shaped the metal around the rod. Jim worked the torch while I bent the metal. Then we put relief cuts in the side, and shaped the panel the opposite direction to make the transition down under the car using the edge of the vise. Surprisingly, it worked and fit perfect the first time. Not bad for our first time making a panel in this fashion - I'm used to buying patch panels pre-fabbed. -TH
Here the panel is welded into place...almost. My only mistake made is that I misjudged the size of the panel before the edge was made. This left a gap on the left side about 1/3 inch. I simply cut a sliver of metal and stiched in on this side to fill the gap. Next time, I'll leave this side long and cut it to fit after the bend is made, rather than trying to measure it exact before hand. -TH
Meanwhile, on the top end, I had to continue to fill in gaps between the rear fender and the body. In this case, I welded a bead on each side of a nail laying in the channel. When it's ground down, the transition between the two will be filled. Only trouble with this is that the gap has that gooey under-coating in it, and on the top side of the nail, it bubbles through and reeks havoc on the weld. Notice the black on top...that's from the undercoating burning. -TH
These rear fenders are a pain to grind smooth. The old nasty welds are so inconsistent, that some parts are super thick, and others are paper thin. Plus, who ever did the work in the first place totally didn't line anything up properly and everything is uneven , and just plain sloppy. And since its hollow underneath its also really, really loud - even with ear plugs. -SB
This rear piece of metal that sits right above the bumper was so flimsy, it had to go. There's a few rust spots in the rear above it that will need to be replaced, and then a smaller, thinner rear bumper will go into place here. The guy I bought the Buick off of has a 1936 with a neat rear bumper, and I'd like to go with something like that. That's the fun with Hot-rodding...you can make whatever you want. I just have to figure out how to get one free....I'm on a budget here! So far, the sheet metal ran me 30.00 at Lowe's...so we're up to about 230.00. -TH
Thursday, June 19, 2008
Smoothing Channels
Without a doubt, we knew there was going to be a ton of welding, cutting, and grinding before this car even saw the beginnings of primer. The previous owner (or previous, previous owner) decided to weld the rear fenders (or quarter panels, whatever) onto the car. Only problem, is it looks like they did it with a stick welder, turned down low, slobbery, and um...horrible. It was ugly. Very ugly. Not that I'm a perfect judge of welding, but nonetheless, Sara needed to grind the living daylights out of the channel where the fender meets the rear body. I ended up having to weld more spots in the channel between the two and even add some nails into the section to use as filler metal, just to smooth over the transition between both body panels. I could have used lead in this case and most old schoolers will, but I opted to just fill in what we had. When the grinding here is all done, I think skin coat of body filler will go in, and the seam should look pretty good. -TH
There's like 4 photo's of me throughout this whole thing, and 3 of them are of me grinding. That's my job: grinding, grinding, grinding until I'm done. Then grinding some more when Tim finds more stuff for me to grind. -SB
This day was a dud on my end. While Sara was grinding the channels above, I discovered that the rust under the rocker panel and front part of the rear wheel housing was just too much to ignore. What's worse, is that the car was coated with old school undercoating, which according to Jim's dad, was a dealer option back then. The stuff has the viscosity of tar, but after 58 years, it does one of two things - either flake off, or become fossilized, rock-solid tar, to which a chisel won't remove it, and a grinder makes a mushy mess - like grinding asphalt. I managed to get the cancer cut out and fabbed up an inner rocker panel bottom, which I tacked on. Here I am, showering myself with sparks. After this, the lower back-half of the rocker and wheel housing needed to be replace, the front lower half of the fender, and then it would be on to the front of the rocker panel. Oh, and then the other side. Work, work, work... -TH
Yeah, I'm not peeking in at the fender. Turns out, while welding the lower part of the rocker in, a weld got too close to a rubber drain hose located in the area. I happened to notice smoke rolling out of the fender when FIRE, 2.0 erupted! I quickly ran to grab the fire extinguisher we used on FIRE, 1.0 and......it was empty! Evidently, fire extinguishers are one-use only these days. I quickly ran up to the house, and knowing I couldn't get the hose all the way down there, filled up a bucket, and my mouth with as much water as I could. I stuck my head in the fender, where I could barely see the flames and let the water rip like I was doing an asthma test! Luckily, it went out and FIRE, 2.0 was extinguished. With the lower rocker edge welded into place, this day was full of duds...and smoke. -TH
Even though we promised Jim we wouldn't start any fires while he was gone,
I was still curious on the condition of the STR8, and even though I made the decision to rebuild the car and body first, and then the engine, I decided to pop the valve cover off and take a peek. I expected to find a ton of sludge, as older engines normally do not carry much oil pressure (if any) up to the valves. I specifically remember filling a coffee can full of sludge from a Chrysler 318 one time when all I was doing was valve cover gaskets. I was amazed to see that there wasn't any sludge or garbage at all. In fact, it looked really good! Big relief, especially considering the motor turned over as easy as it did. -TH
Monday, June 16, 2008
welding nails in holes..
Now that we're hogging Jim's garage with Betty right smack-dab in the middle, we've figured we should work our little buns off as fast as we can to get the body work done so she can be primed and wheeled outside again. So, day 1 marks the "weld nails into holes" day, which is just as it sounds. Removing the trim pieces left big ol holes to fill, so Tim welded those shut and I ground them smooth. That was fun, but left my hands numb and ears foggy. I know, I know... ear plugs. -SB
The 16 penny nails were the perfect size to fit backwards into the trim holes, tacked into place, and then welded around. Sara then ground each one flat. Towards the bottom of the above picture, you can see part of the area were the old-school body repair was done. Once we blasted all the body filler away, it left the small holes that were drilled to pull the panel straight. The back quarter panel here is a disaster as well, slathered in body filler where there should have been metal. -TH
Everything was going really well... until one of the welds on the door panel caught the door on fire. Disaster was quickly adverted with me yelling "Uh, Tim.. we've got a fire!" and Jim bolting to the rescue with the fire extinguisher and water. Just keeping you on your toes, Jim! We're nothing if not entertaining! -SB
Turns out 58-year-old door insulation does not like hot hot heat.
We pretty much knocked day 1 out of the park, which gives me hope that the rest of this rebuild won't take too long. -SB
So at this point, we're not too much into the money. Around 200.00 for the sandblasting and gas to get the car there. Next up, fabbing up some rocker panel replacements, lower front quarter panels, and replacing the huge gaping hole in the trunk. -TH
Sunday, June 15, 2008
hey mr. sandblaster!
Tim tricked me with this, because I had no idea this was going to be an a-l-l-l-l day affair. He did say I would get dirty, and get dirty we did. After breakfast at 9 o'clock, we arrived at the sandblaster and quickly unloaded the car. I got to "drive" it off the hauler, which was fun, but quite hot. It was a little like sitting in a rolling tomb with windows, a funky smell, and seats that aren't quite bolted down... oh, and no brakes whatsoever. So it was me with Momentum as my back-seat driver, who I'm pretty sure was heard laughing the whole time. We masked the chrome and windows, put the car on barrels, and had the fellas suit up by 10 a.m. -SB
The sandblasting place is Consolidated Stripping and Derusting, which is in Plainwell, MI. Their link is here.....
http://www.consolidatedstripping.com/
I'd like to start by saying that Don, one of the owners, is one of the most helpful guys you'll find. You'd think that for 35.00 an hour to rent the blast room, with full gear and media that you probably wouldn't get that great of service from the guy - think again. Don will give you advice on how to blast, taylor the equpiment to suit what you're doing, show you how to use it, and...he even offered to lift the car up with the forklift and put it on barrels just to get the underside. Anything you need...he's there to help. If you ever need anything sandblasted, they have small booths, the room...everything you need. Total cost to blast the car was less than 200.00!! -TH
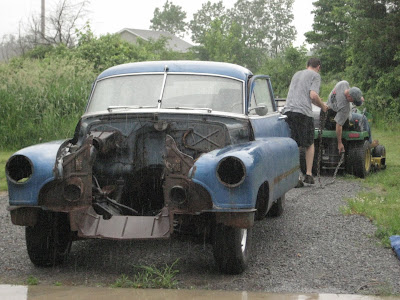
I look like I'm ready for the HAZMAT radiation team! The respirator is sweet, because the room gets up to about 90 degrees with all the lights...the respirator pumps in cool air (the helmet is airtight) so your head stays cool and the dust stays out. -TH
They were rollin' by 10:30 a.m. and after a few glitches and a couple of breather breaks, they were done around 4:00 p.m. -SB
I sandblasted a few of the miscellaneous parts, mostly to kill time & so I wouldn't have to wait longer for the boys to do it once they were done with the car. The reload onto the car hauler went quick as can be, seeing as how we're old pro's at it by now. At the end of all this, Betty may just load herself on. -SB
Surprisingly, we didn't find a lot of body damage. There's some rust on the rear quarters, in the wheel housing, the rocker panels...oh, and sometime in the car's life, someone looked like they swiped a guardrail...or a mailbox...or a cow...or something. The repair on it was done with old-school tools, drilling, slide-hammering, and working a dolly all over it. It will need to be skin-coated again. -TH
Next up...filling in every single trim-hole and grinding, grinding, grinding... -TH
The sandblasting place is Consolidated Stripping and Derusting, which is in Plainwell, MI. Their link is here.....
http://www.consolidatedstripping.com/
I'd like to start by saying that Don, one of the owners, is one of the most helpful guys you'll find. You'd think that for 35.00 an hour to rent the blast room, with full gear and media that you probably wouldn't get that great of service from the guy - think again. Don will give you advice on how to blast, taylor the equpiment to suit what you're doing, show you how to use it, and...he even offered to lift the car up with the forklift and put it on barrels just to get the underside. Anything you need...he's there to help. If you ever need anything sandblasted, they have small booths, the room...everything you need. Total cost to blast the car was less than 200.00!! -TH
I look like I'm ready for the HAZMAT radiation team! The respirator is sweet, because the room gets up to about 90 degrees with all the lights...the respirator pumps in cool air (the helmet is airtight) so your head stays cool and the dust stays out. -TH
They were rollin' by 10:30 a.m. and after a few glitches and a couple of breather breaks, they were done around 4:00 p.m. -SB
I sandblasted a few of the miscellaneous parts, mostly to kill time & so I wouldn't have to wait longer for the boys to do it once they were done with the car. The reload onto the car hauler went quick as can be, seeing as how we're old pro's at it by now. At the end of all this, Betty may just load herself on. -SB
Surprisingly, we didn't find a lot of body damage. There's some rust on the rear quarters, in the wheel housing, the rocker panels...oh, and sometime in the car's life, someone looked like they swiped a guardrail...or a mailbox...or a cow...or something. The repair on it was done with old-school tools, drilling, slide-hammering, and working a dolly all over it. It will need to be skin-coated again. -TH
Next up...filling in every single trim-hole and grinding, grinding, grinding... -TH
with a little help from our friend
Day 2 of prepping for the sandblaster meant Jim helped with the little things we forgot, like removing the portholes on the hood, a few trim clips we "accidentally" left on the car, a few other odd and ends, and helped load her on the car hauler for the umpteenth time. -SB
Right around here, it started pouring rain. What fun. -TH
degrease, de-glitz, de-glamour
May rolled into June and we had a date with the sandblaster. Armed with flat-headed prying tools, a gassed up pressure washer, and gloves so as not to touch anything icky, Tim and I got to work prepping Betty for her big date. We stripped her of all her glitz, pulled what seemed like a million random parts out of the floor-less trunk, hosed the gal down and sent her on her way. -SB
All that crap in the tote came out of the trunk. Interior parts, exhaust manifolds for other cars, fuel pumps, bolts, the gas tank, emblems, and a big ole' piece of sheet metal covering the gaping hole in the trunk. -TH
Subscribe to:
Posts (Atom)