Thursday, July 24, 2008

Some of the last welds....for now...

So with the last day of my vacation, I spent the mid-morning finishing up the back end, and grinding everything down. I needed to do alot of hammering and shaping with a dolly to bring the right curvature and such in with these back pieces. They were tough. I got them good enough though that a good skin-coat of filler should smooth everything out. Should. I'm not a good body person. I have no patience. Let's hope. -TH


This little corner was rotted, so I chopped it out and fabbed in a quick piece. This'll be the last piece I weld until I do the rear floorboards later on. -TH


Here's the back with the first coat of filler on it. I've grated it down a bit, and will finish with the air file and add another coat. -TH

Wednesday, July 23, 2008

Gettin' out junk in tha trunk.

So this was the final welding frontier. The trunk. Or...what's left of it. When we finally pulled the dozens of old car parts out of the trunk, this is what was left - a nasty, rotted out trunk, with a big piece of flatstock sheet metal over the gaping hole. Luckily, the cross braces that go underneith the trunk were still in tact, so at the sandblaster, we simply blasted around the area that was going to be cut out. I chopped out the nasty cancer, and proceded to weld in the pickup truck bed replacement panels I picked up. The nasty, nasty spot was the back edge of the trunk. This spot was rotted all the way through to the back metal near the bumper. The whole thing needed to be cut out, and re-done. Luckily, I was on vacation this week, so this post covers two days of hacking, welding, measuring, cutting, and re-welding. My back still hurts from bending over into the trunk. -TH


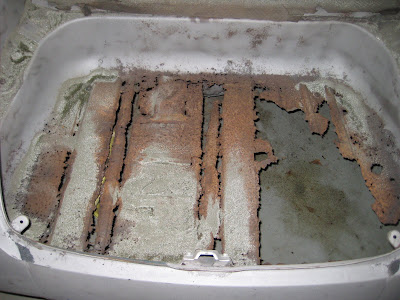
Ahhh. Much better. Looks like a new trunk! I used a large piece of cardboard as a template to cut the metal to a perfect size to fit around the edge I cut out. Worked perfectly. Once the whole thing is done, I'll cover the weld in seam-sealer, and use pickup truck bedliner on the whole thing. Now...for the back ugly stuff... -TH


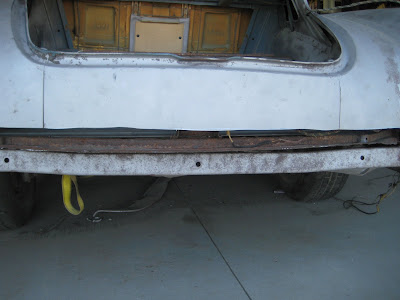
Here, you're looking at the back latching mechanism for the trunk, and the metal area around it. The metal has already been cut out from the rear of the car, and the piece that overlapped the rusty metal you see here, and went into the trunk. There's actually 3 pieces of metal that come together right at the rear of the car, and are spot-welded at the factory. The rusty piece you see here, the back of the car, which makes a 90 degree bend under the car, and the trunk floor, which sits on top. I cut away the cancer, and then split the spot welds with an air chisel. (Thank you air chisel, you always make life so much easier). -TH


Here's the back half of the car, you can see the rear cut away. Thin panels will need to be stiched in here, and have a 90 degree bend on them at the bottom, where they can be tacked to the underside. -TH


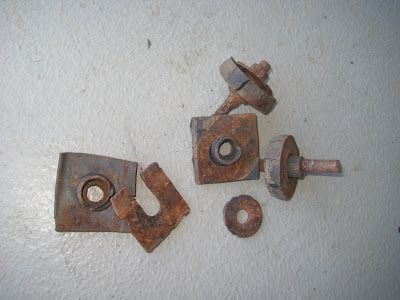
In the back, I had to remove the 60 year old rubber bushings that insulated the trunk floor to the rear of the frame. I'm not sure what I'll replace these with, but I'm sure I can fab something up easily from new parts. These had to be removed to put the new metal in. They, of course, had to be cut off. I didn't even attempt to turn them with a wrench. -TH


The rear and rear edges is where things had to get creative. The sloping side of the trunk here was all rotted out, as was the rear section where the corrugated new metal ends. The whole thing needed to be fabbed up, and stiched together. -TH

Here's the rear of the car, in progress. This is a tough piece as the back of the car has a slight roundness to it. This so far has been alot of tacking, hammering into shape, and tacking again. Suprisingly, it's coming together good. The back seams that run vertically from the trunk down on both sides will be welded shut and smoothed down (the one on the left is already welded). -TH

Here is the underside of the rear pieces. You can see the 90 degree bend, and stiched to the underside. Luckily, we sandblasted alot of the scale off this area, otherwise it wouldn't have welded at all. -TH


Thursday, July 17, 2008

Rockin it....part II

Well, before I started on the rocker panel on this side, I needed to tackle that filler-infested rear part of the rear fender. Here, the patch panel is stiched in. I had to set the welder really really really cool because there was spots all over in the left side that just burned right through, even with just a quick 2-3 second spot-weld. This panel was really pretty easy to fabricate, it's just a square piece of metal that's rounded down. -TH


Here's the finished product, after the welds are ground down. Hard to believe its the same panel. There's still a small piece at the end of the fender lip (at the bottom) that still needs to be cut back. -TH


Yeah...so here's the rocker from the passenger side. Not as bad as the drivers, but nasty enough to house an ancient civilization of mice at one time. Yum. There was actually bare, clean metal on the inside of this rocker that didn't have a speck of rust on it. Crazy. -TH


I figured I'd just cut to the chase on this one...you've seen the other side. Here this rocker is, done. Notice, once again, all the holes down the door to pull out the metal at one time. -TH

Time to fill....

Finally, it was time to start adding some body filler to the drivers side, and get things smoothed out. First, any areas that still had heavy pitting that the sandblaster didn't get out were knocked down with a grit pad attached to the grinder. Harbor Freight sells a really nice one for 2.00. It's a sponge material that's abrasive. They wear down, but don't cut into the metal like sanding discs can. Here, you can see this area cleaned up. -TH


And the body filler starts.


Here Jim's running the cheese grater across the high spots while the filler is just started to set up. This saves alot of tedious sanding later. And I hate sanding. -TH


For the rear fender channels, I wanted to use something that had a bit more strength than regular fill. Even though the area was fully welded and ground down rather than leaded, I figured I still didn't want to take the chance of anything cracking. Bondo sells a fill thats aluminum. It can be drilled and tapped, and is essentially glorified JB Weld. I figured it would have alot more strength. It is expensive - 20.00 for a quart...but all we needed was enough to do the channels. Once these are smoothed out, we'll put fill over the top to smooth out the low spots and be done. Well, not done...but you know. -TH


Ok...maybe just the wheelhouse from hell...

The passenger front part of the rear fender was fashioned in the same way as its brother on the other side - heating it with a torch to make the curved 90 degree bend, with the transitioned lip. The ground metal against the sandblasted car looks odd, and there's still some more grinding to do. Notice the holes done a long time before to slide hammer out what looks to be a guardrail side-swipe. -TH


This one little section, directly in the middle of the fender was rotted out, so I had to cut it out and weld in a small patch piece.


Here it is...the ugly of ugly. For some reason, my dopey self forget to take a picture of the hell that was here before I cut, fabricated, and welded this mess...but here's the finished result. This was the biggest pain in the ass on the car so far. Every piece of metal under here was rotted out. I had no idea where to begin. Welding to rusted metal sucks, and this was no exception. All in all, for what I had to work with, it's solid, and will look fine once some seam-seal is put in, and the entire thing is undercoated. -TH


In the interim, Sara was beginning to got bored, so I finished welding the channels on the passenger side, so she could finish them off.


Oh...and then there was the rear section of the passenger rear fender. Does it ever end? At this point, I was beginning to think it wouldn't. This piece was nothing but a big, festering piece of body filler. I took the grinder to it to see if any metal was buried underneith....notta. It all was going to have to come out. Even the fender brace that holds the fender secure to the wheelhouse was rotted and gone. Oh, what fun. -TH

Saturday, July 12, 2008

The wheelhouse and fender from hell.

The fender from hell started out as just an innocent slather of body filler shown here. I marked out the section to cut, and decided to do the optional little upper "square" by itself, this way I didn't need to fabricate the drastic curve and bend to the left of it. Besides, the metal was fine there. What was revealed behind the fender here would be the start of a massive undertaking to re-build the inner wheel house, which had deteriorated really, really bad on this side. -TH


Chopping the old crap out...


The money shot. Ohhh yeah, a pint of body filler for one fender! -TH


Behind the fender, the wheel housing had completely seperated from the inner fender. It was going to take lots of fabricating pieces, bends, and welding to nasty, rusty metal to put this thing back together. -TH


Meanwhile, Sara ground down the welds on the other side, where I had welded the rocker panel on. Turned out pretty good! -TH

I'd been around these past few days, but didn't have much to do since Tim was busy fabricating half the car as best he could before he could weld anything on. So, I checked my email a lot, tried finding cheap junk on craistlist.org and kept him company. I'll be back in the swing of grinding away the boogers just as soon as I can...! -SB


This project ended up taking two nights. I left the first night pretty bummed out, as the inner wheel housing was taking forever, and welding to dirty metal always sucks. There just wasn't enough room to fit a grinder in there and clean the metal up in some spots. It was tough. Real tough. -TH

Saturday, July 5, 2008

Rockin it...or something. Part I

So this is what we were dealing with on the rocker panels. Rust holes everywhere, and paper-thin metal gave me no real solution to "patch" anything in. Hence, getting the replacement rocker panels was a good move...Now, to get the old one off and get going on the replacement. -TH


The panel got cut off with a sawzall on the top black line (in top pic), and along the bottom seam where the rocker is spot-welded to the back half of the rocker. At the front, cut close to the edge, I cut the panel leaving a 2 inch area of the old rocker to butt-weld together here. The factory rocker bolts the front fender and the rocker together, and it just wasn't worth trying to figure out how to make that seam, so I saved that small portion of the old panel and cut the edge to match on the new panel. You can see some rust from the rear rocker panel. I'll fix that later, or try to forget about it. Shhhh! -TH


Here the rocker is tacked and stiched to the floors. Later, I'll go back and finish the complete stiching across. Notice how the previous owner booger-welded pieces of galvanized metal patch-panels into the floors. I'm still figuring out what I'm going to do with these. Probably cover them in dynamat, carpet, and forget it. -TH


Success! The panel fit perfectly, has the exactly same transition as the previous pieces, and looks great. Now, I just need to finish the welds underneith and on top, and start grinding everything down. Sara, where are you? Next up, the other side, plus fabbing the rear pieces of the other rear fender. My goal is to have all the metal work finished next week, so we can move on to body filler, sanding, priming, and hopefully painting by the end of July. -TH